Wait a sec, what the heck?
A VPS? I faintly recall talking about that already. A magical box that has near perfect internet connection but has bandwidth caps. But I guess the most pressing part (that is the required section listed here) is the steps I took to setup specifically this VPS. Well as I stated before, I went with vultr as my VPS provider, not only because it doesn’t trap you into a 2 year plan, but because several reviewers I know recommended the platform. So let’s start with creating a VPS from there.
VPS Deployment Guide
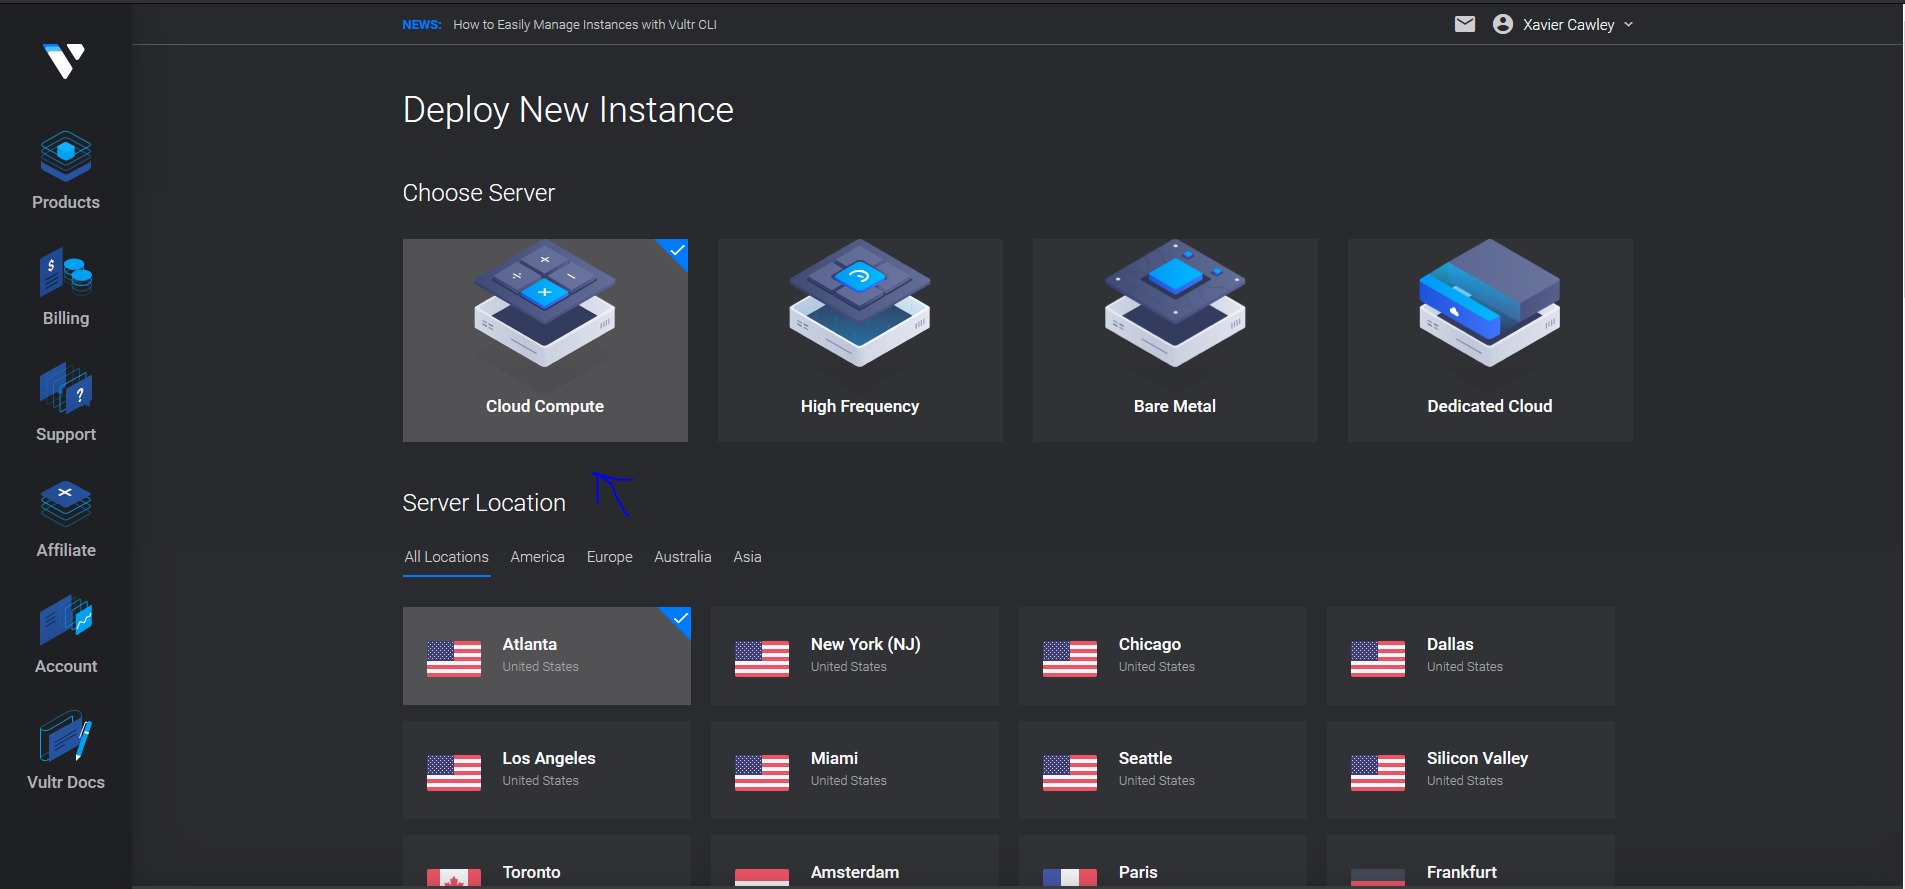
So in my case, (my case being that I am a college student with limited resources pls help me I want money so bad) I picked the cloud compute option. This option contains the cheaper more affordable servers, however they are still relatively good.

For server location, just choose wherever is closer to you. In my case it is Seattle. Now let’s talk about operating system and “server size”. Personally, I chose debian 10 (buster) Not only because it was more minimal, but because I also setup an email server on it and found debian to be a little more reliable package manager wise. You can choose cent os 7 if you want to follow the herd, would be wiser too, every single guide (that our teacher assigned) talks about cent os 7. As for “server size”, anything is good. Except the ipv6 only option. For that one only people who have ipv6 will be able to access your site, and the majority of people are still on ipv4 so it would not be a wise choice.

And now it’s smooth sailing from here. Remember how we setup everything for the VM? We just need to install the LAMP stack from my previous guide. Or in my case, a LEMP stack. But it’s not that simple. Next we introduce a new step, virtual hosts.
VirtualHost? Wait, what?
To put it very simply, a virtual host is used when you want your 1 web-server to act as many other domains or have subdomain support. As to why we need this? This helps a lot when setting up HTTPS, specifically using certbot. Another use for me was to set up my email server. But how exactly do you set that up? Well it really depends on which web-server package you are using. For the vast majority, that would be apache2, for my case it would be nginx.
The NGINX way
I’ll start with the way I did it. I first copied the template already available in /etc/nginx/sites-available and changed it to my liking.
server {
	listen 80 ;
    listen [::]:80 ;
    root /var/www/html;
    index index.php index.html index.htm
    server_name test.com www.test.com;
    location / {
        # First attempt to serve request as file, then
        # as directory, then fall back to displaying a 404.
        try_files $uri $uri/ =404;
    }
    # PHP stuff, replace "7.0" with the version you're using
    location ~ \.php$ {
		    include snippets/fastcgi-php.conf;
            fastcgi_pass unix:/run/php/php7.0-fpm.sock;
    }
}
Make sure to change “test.com” and “www.test.com” with the urls you want, and of course replace the php versions with the one you have.
By default, this is the default config, so nginx would already have this linked to your “sites-enabled” directory. How ever, if it isn’t. Use the following command
ln -s /etc/nginx/sites-available/default /etc/nginx/sites-enabled/defaultNext we restart nginx to reflect the changes.
systemctl restart nginxThe Herd Mentality Way (Apache)
If you’re anyone that isn’t me in the same class, you’ll find yourself using this method on cent os 7. Let’s start with editing the main httpd.conf file. We’re going to tell apache to look at the same directories as nginx usually does. This way we would not need to touch the main config file ever. Run the following command:
echo IncludeOptional sites-enabled/*.conf >> /etc/httpd/conf/httpd.confNotice the double chevrons “>>”. This means to append that line to the end of the file. Make sure you use double chevrons, or else it will overwrite the entire file with just that line!
Now that we have that part done, we set up the same directories nginx has like so:
mkdir /etc/httpd/sites-available /etc/httpd/sites-enabled /var/www/html/logWith that done, we need to create a virtualhost file inside “sites-available”. Do it using the favourite text editor of your liking, I am using vim
vim /etc/httpd/sites-available/mysite.com.confNow we need to add the following text in that file:
<VirtualHost *:80>
    ServerName www.example.com
    ServerAlias example.com
    DocumentRoot /var/www/html
    ErrorLog /var/www/html/log/error.log
    CustomLog /var/www/html/log/requests.log combined
</VirtualHost>
Remember to change “example.com” to whatever domain name you have. Next we symlink this file to the “sites-enabled” directory
ln -s /etc/httpd/sites-available/mysite.com.conf /etc/httpd/sites-enabled/mysite.com.confRestart apache to reflect these changes.
systemctl restart httpdA Domain?
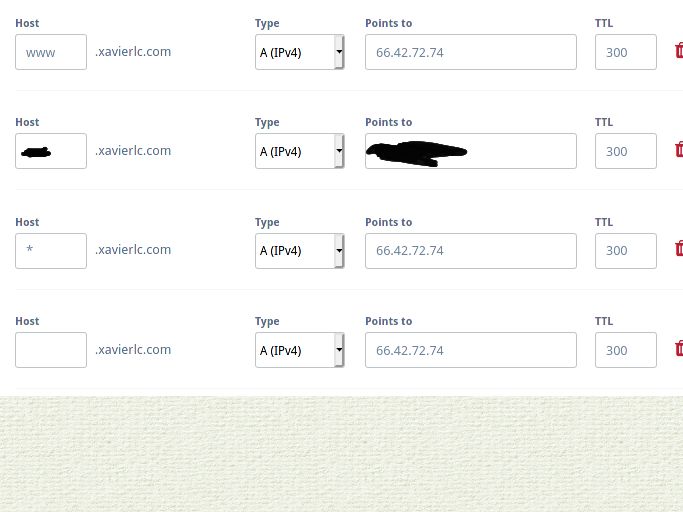
You may still be using your ip to connect to your server. However, nobody remembers just random numbers, so we need to link our site to a domain by using an “A record”. You first need to buy a domain name or just grab a free one. Personally I used “epik“. Then what you need to do is add your server ip as an A record like so:

Once you save your changes, it should take a little bit for your server to start showing up when you type in your domain into your web browser. However if you keep on getting redirected to a parking page of sorts, make sure to clear your browser cache. Once you have this done, change the default url in wordpress. Like so:

Being Legit on the net (HTTPS)
So now you have almost all the components ready. Most days, modern browsers warn you when connecting to a site that only supports HTTP, because traffic isn’t encrypted. Having HTTPS tells the web browser that your website is legitimate with a certificate. Now since we already set up virtual hosts, this process is simple. First install all the necessary packages:
Debian (With nginx)
apt install python-certbot-nginxCent OS 7 (with apache)
yum install epel-release
yum install certbot python2-certbot-apache mod_ssl
And then run certbot to install the certificates for you. (Make sure you read each step carefully when running the wizard)
certbot --nginx
#or
certbot --apache
Now we want to setup a crontab to auto renew these certs. Run the following command
crontab -eIt might ask you for your favourite text editor. Then it will show you a lot of text on the screen. Add the following text to the bottom:
1 1 1 * * certbot renewSave the changes, and now your certificates will auto renew.
So How About WordPress?
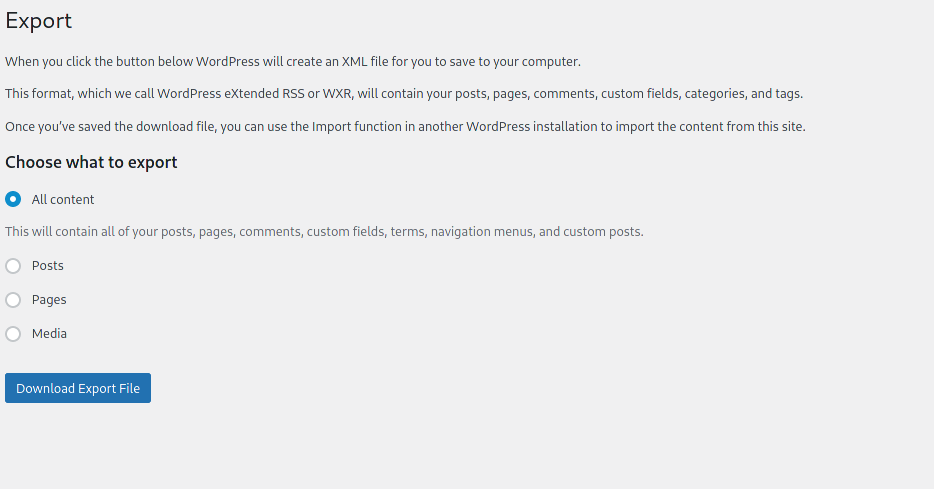
Now that we have all the other things setup, we need to import our content from our vm to our vps. And that might be easy or hard for you. Actually, it depends on the number of images you may have. Start by exporting your entire site content like so:

What this does it export your entire site contents into a simple XML file. Now that we have that, we can import the XML we just downloaded into our new wordpress site.

And now assuming you can follow the wordpress instructions, you now have all your content there…. Well, except for images. This can get tricky as when you’re importing (at least for me) it still expects all my images to be stored on a local ip address (This means you cannot access your images from anywhere outside your home!) You can painstakingly upload everything back, or you can use rsync to try and move all those images into your vps. However your results may vary.
We did it!
Congrats! Now your wordpress site is public and available for all to view! Thought daunting at first, the payoff is a wordpress site with HTTPS… Which I mean probably wasn’t your payoff, but it sure was mine. (seeing how this is required!) Although it does not have to be as stale as just another wordpress site. Feel free to experiment with it! With virtual hosts, you can now do things like an email server/client. (which i’ve setup for fun) Or hey, convert to the dark side and use debian with nginx instead! Basically what i’m trying to say is that I really don’t have any other ending words to say that will further increase my word count. Have fun!